This technical instruction goes with machines, it is also the instructional document which makes sure you’re correct using. Please read it carefully and keep it well. Please operate the machine per this instruction, if any problems or questions, please contact us freely. To bring the superior function of our machine into play, and ensure the safety of the user, please read this instruction carefully before installation and operating. Then you can have acknowledge in details about what should be paid attention to, and the action and operation, inspection of the abnormality and daily maintenance rules etc. It is our target to make the customers satisfactory. Thank you for your cooperation.
Technical date
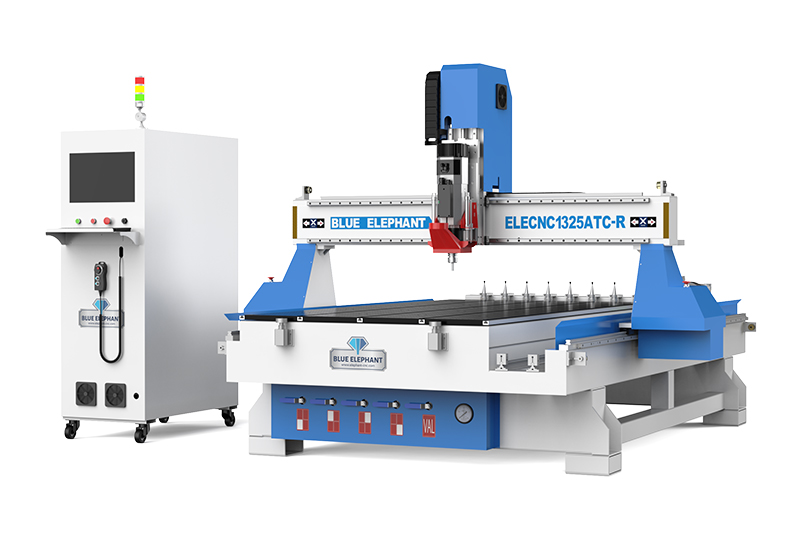
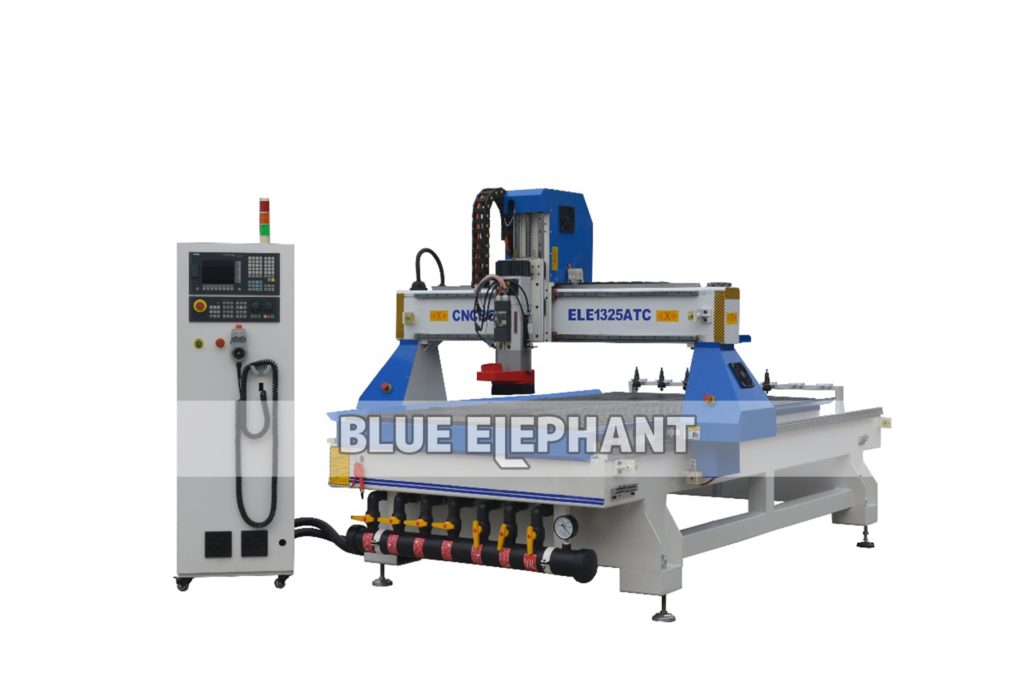
Type:ELE-1325ATC
Working table size: 1300*2500*300
Transmission: X, Y rack. Z ball screw Transmission
Linear guide rail: HIWIN 25#
Voltage : AC380v3ph
Spindle power: 9KW HSD ATC SPINDLE.
Inverter : Delta 11KW
Spindle speed:18000rpm
Traveling speed: 32m/min
Feed speed: 20m/min
Motor driver: Siemens motor and driver .
Carousel Tool Magazine capacity:8 Tools ISO30
Controller: Siemens 808D
1. Unpacking Inspection
Before works, all the transducers of CNC routers are inspected strictly and packaged carefully. However, damages may occur during transportation process due to various factors. Please check the following items before unpacking. Inform the distributor or us if any abnormity:
Make sure that the machine is not be damaged or distorted during the transportation process.
After open the package, check whether the spare parts are the same with the packing list. Check whether the specification you ordered fits the machine’s nameplate (voltage and KVA)
Check whether there is any abnormity or foreign material in the machine.
2. Safety Notice
This chapter mainly introduces the machine usage notice; the user must read this carefully to avoid the suddenness.
The machine should put on the balanced table, adjust the fundus to make sure the machine can’t shake and keep it horizontal.
Please use the appointed voltage according to the instruction, connect power and put through the grounding wire.
Please do not connect many electronic products on one outlet to avoid overburden.
The engraving machine is high speed working machine; the main spindle speed can reach to 24000RPM. So the operator should wear work clothes and hat, forbidden to wear gloves.
When the machine is working, the operator should keep distance with it. Forbidden to touch the cutter and other motorial parts.
Make sure the electric power is off when clean the machine. Do not clean it with the liquid or the spray, but the dry dust cloth and meanwhile with slushing oil.
When checking the machine faults, Please make sure the power is off.
Do not use this machine near water, for example: near the bathtub, the bison, and the launder of the kitchen, wet floor, or swimming pool and so on.
Do not put this machine on the unstable truck, shelf or tables. Otherwise it may fall down and cause the machine damage or the hurt of people.
Only the electric variety on the nameplate can be used in this machine. If you are not familiar with the electric variety in your place, please ask the vender or the local bureau of supplying electricity.
Triangle plug (ground wire) is available for this machine. This just for ground wire type plug use and this is the safety device. If you cannot use this kind of plug, please ask the electrician for help. But do not discard the safety device.
Do not put anything on the electrical power cable, and do not put the cable in the place that someone else can touch.
Do not make the receptacle or the branch wires afford over-voltage, or there may fire hazard and electric shock.
Please don’t put anything into the aperture or put thing in the machine, or else may get an electronic shock, on fire or other danger caused by dangerous pressure or short circuit.
In order to avoid getting an electric shock, please do not disassemble this machine. If it needs repairing, please take it to the qualified repairing center. Disassembly of this machine may bring the electric or some other dangers. The incorrect reassembly may cause electric shock in the future using (unless operation under the instruction of professional engineers).
Under the following conditions, you need to pull the plug out from the receptacle, and consign the repairing work to the qualified repairing center:
When the cable and the plug are broken.
If some liquid inflow the machine.
If this machine is rained or watered.
If operation is done as what the instruction says, but this machine cannot work, you can only adjust the controlling part of this machine. Otherwise if you adjust other parts incorrectly, you may cause damage of this machine. As to the complex work, you had better ask the qualified worker for help, which can make the machine work orderly.
If this machine falls down to the floor from the high position or the body of the machine are broken.
If obvious changes of the machine’s function occur.
17 Avoid using the machine when it thunders. Or it can cause faraway electric shock.
The transportation, installation and maintenance make the machine operate well.
3. Machine introduction and installation
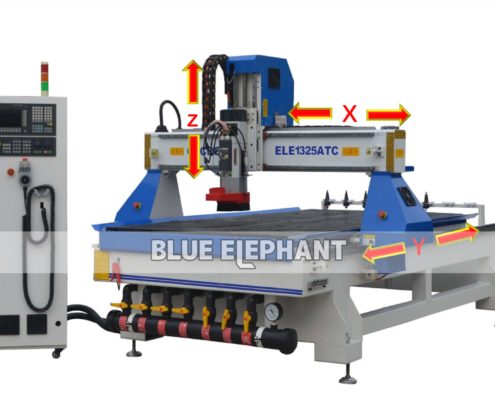
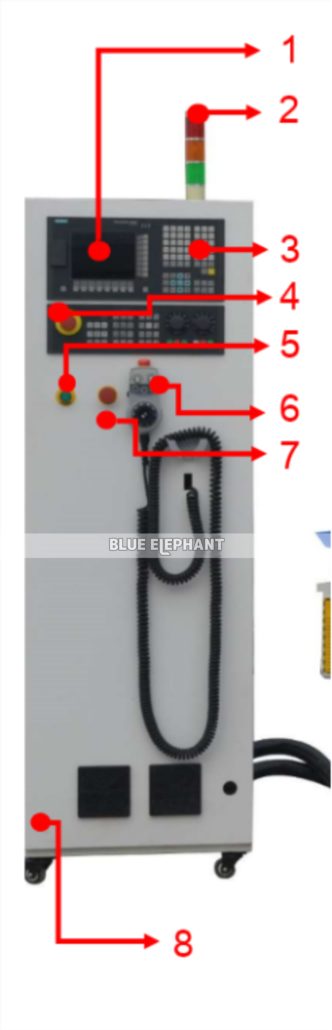
3.1Machine
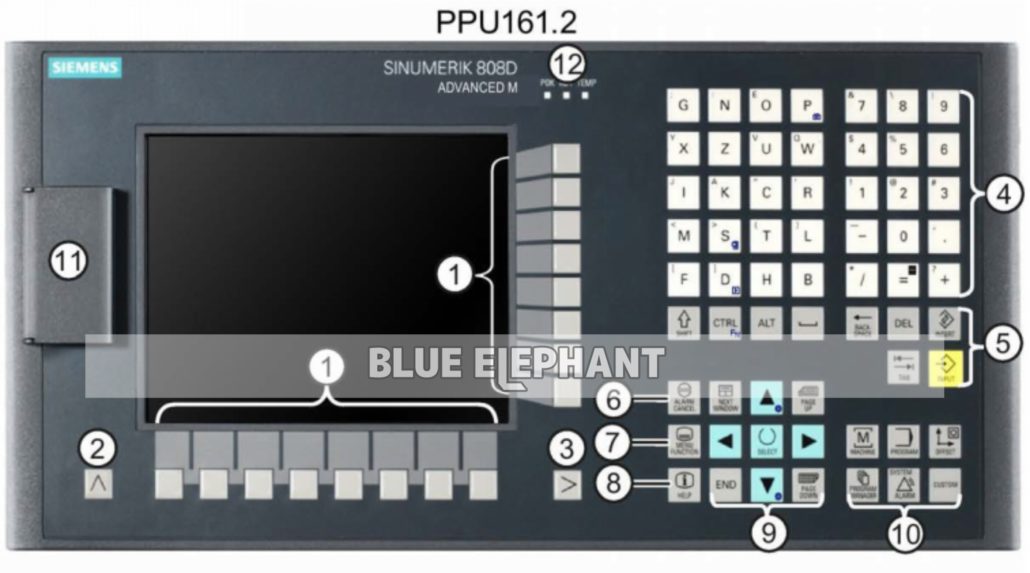
1.System screen 7.Machine power button 13. X Limit pile 19.Limite switch piece
5.Start power button 11.Z axis ball screw 17.Y motor cover 23.Dust collect cover
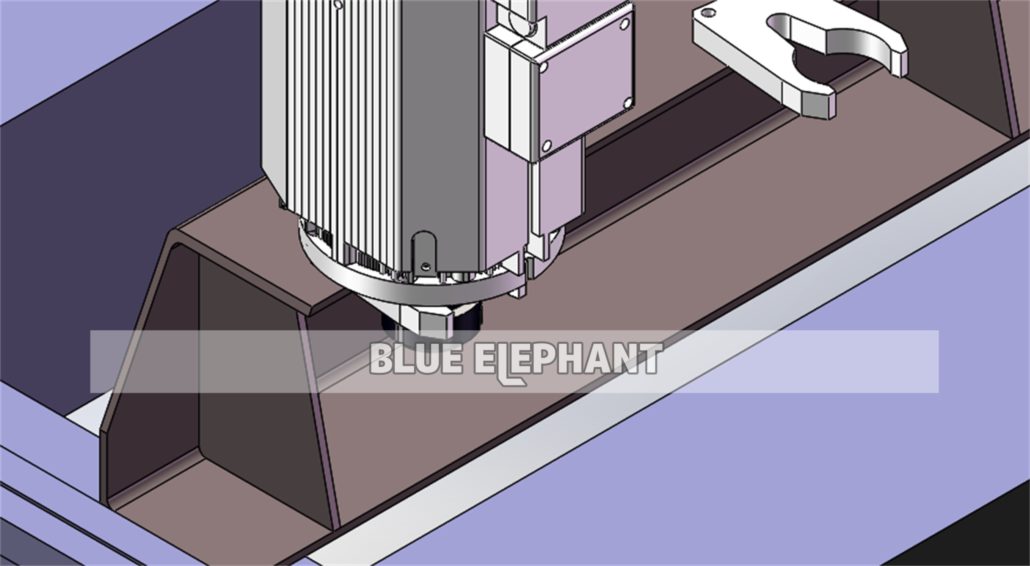
6.MPG 12.Spindle 18.Limite switch
4. Machine installation
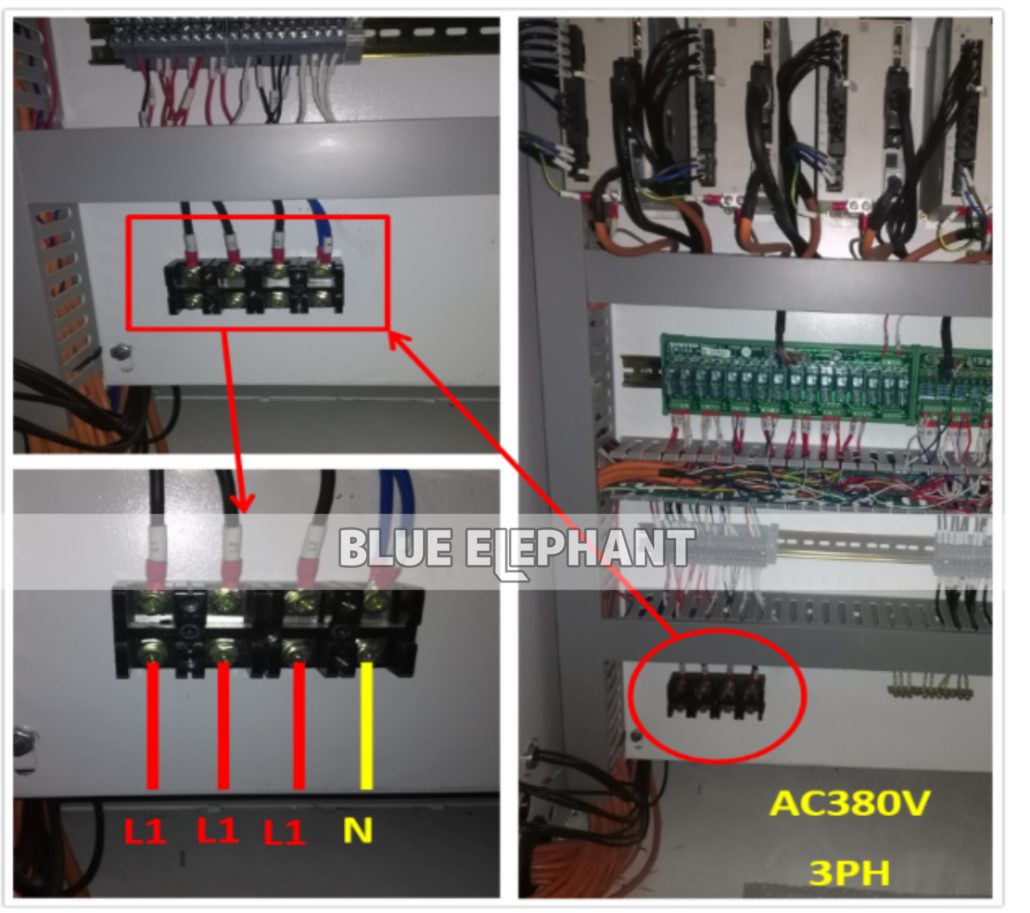
4.1 Power
A, Main power supply
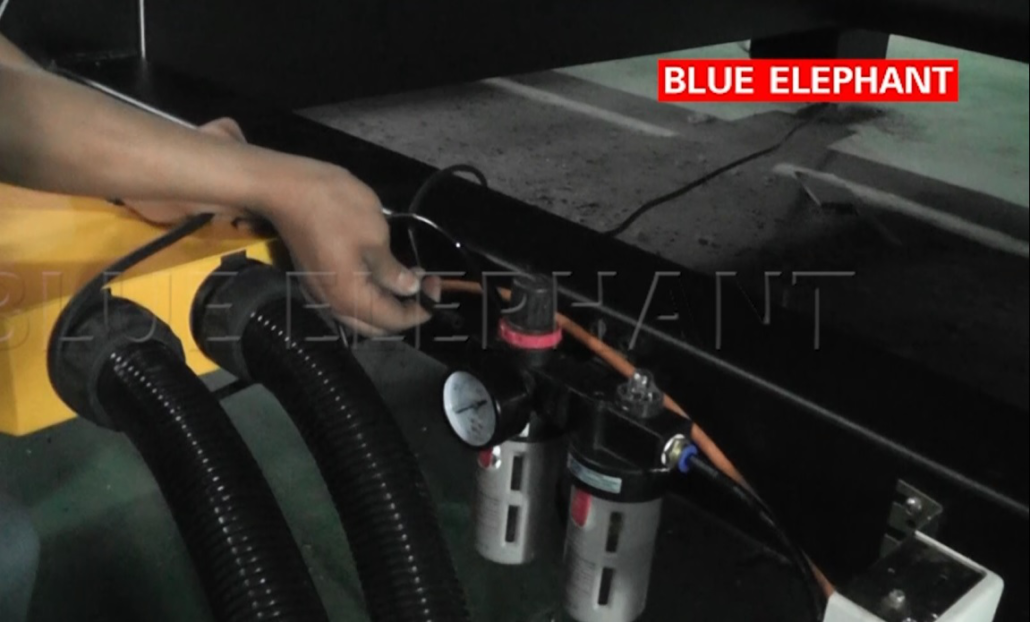
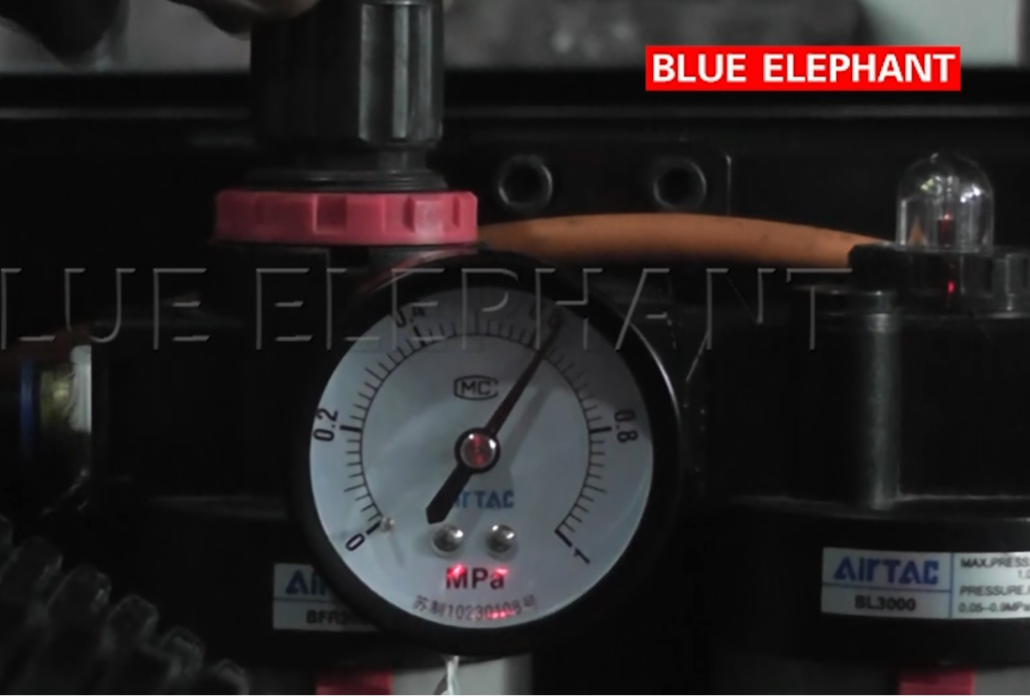
4.2 Connect compressed air
Please the air pressure between 0.6-0.7Mpa
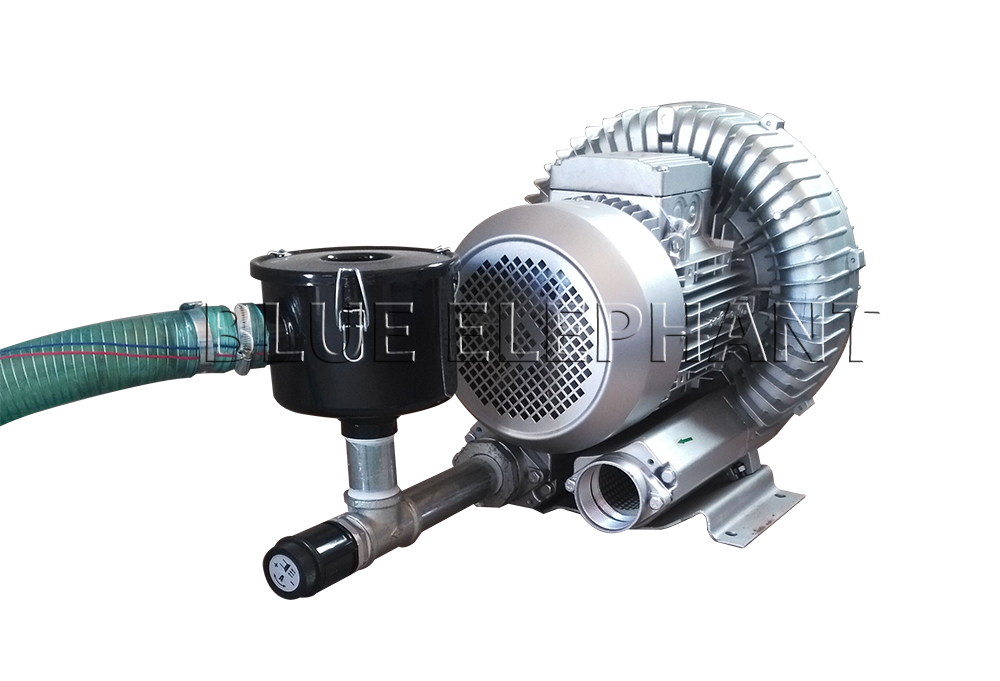
4.3. Connect the CNC machine to the vacuum pump.
4.4. How to connect and use the dust collector system
How to connect and use the dust collector system
A connects with B
A connects with C
D connects with E,C,I
F connects with E,C,I
G connects with H
The motor connects with lines, energizing and begin to use.
5. Operation
5.1Power on
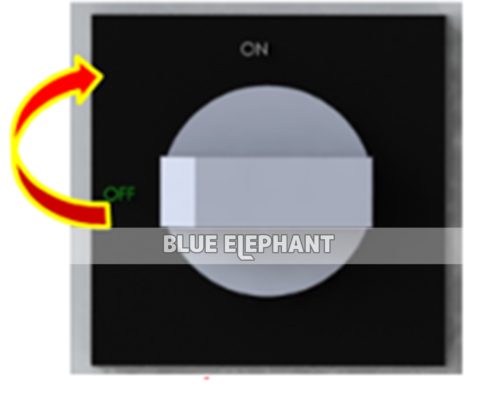
Step1: Turn on the main power
Step2:Release the all Emergency button
Step3: Press the green button Power on 5
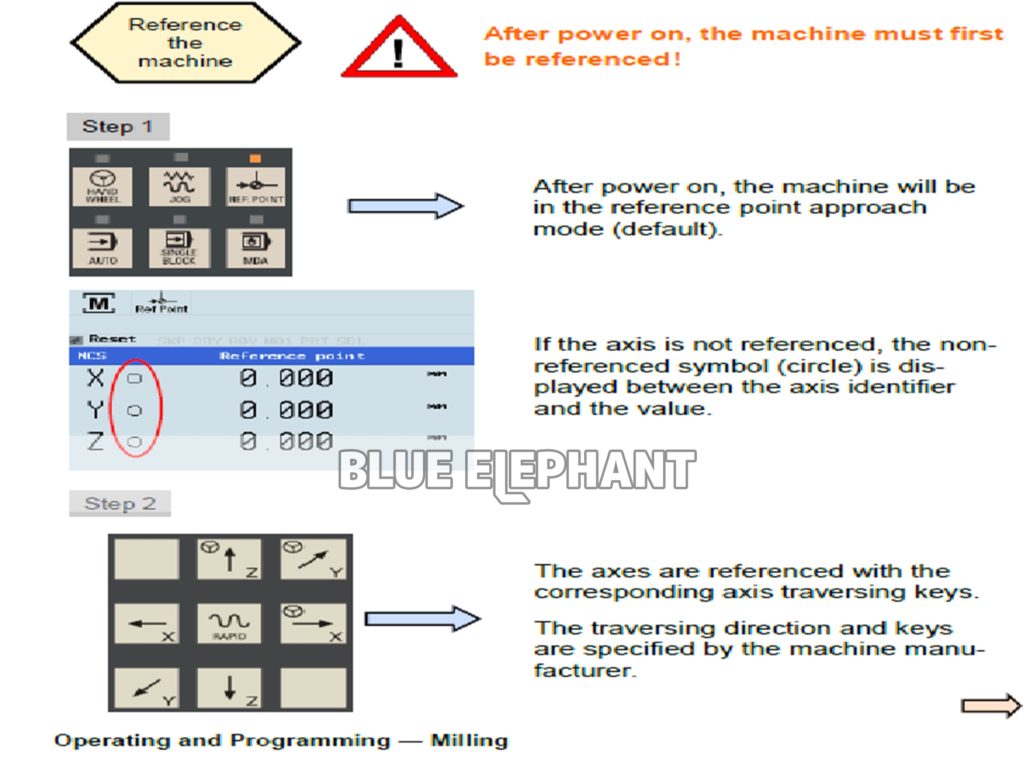
5.2 Back to home
HOME
When turning on/off the CNC and the machine, also observe the machine tool manufacturer’s documentation, since turning on and reference point approach are machine-dependent functions.
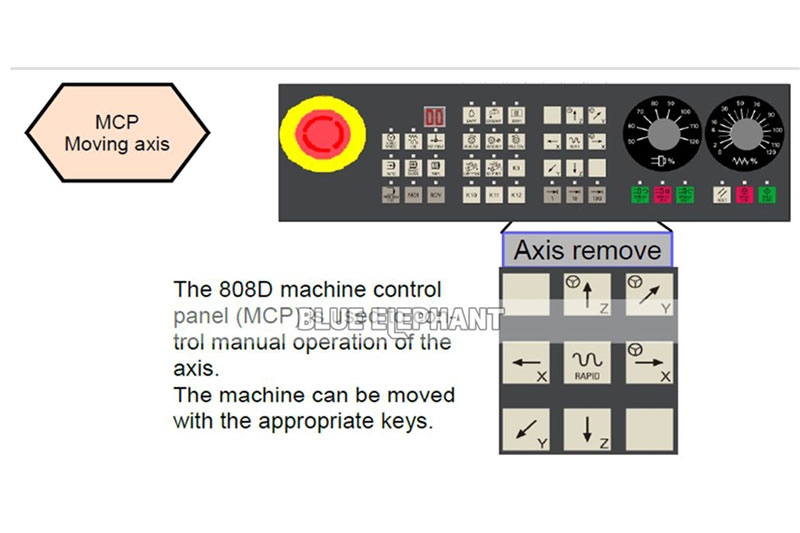
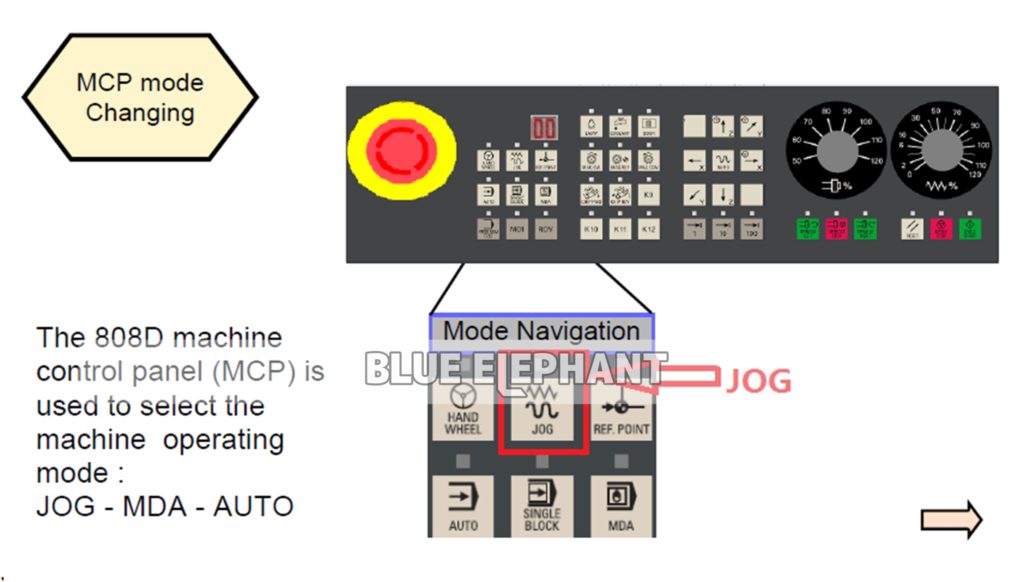
5. 3 Move axis by “JOG”
The steps
1). Press the key “JOG”
2) Then you can move the axis by the keys.
Attention : Key combination
RAPID : Rapid traverse , the axis moves with faster speed.
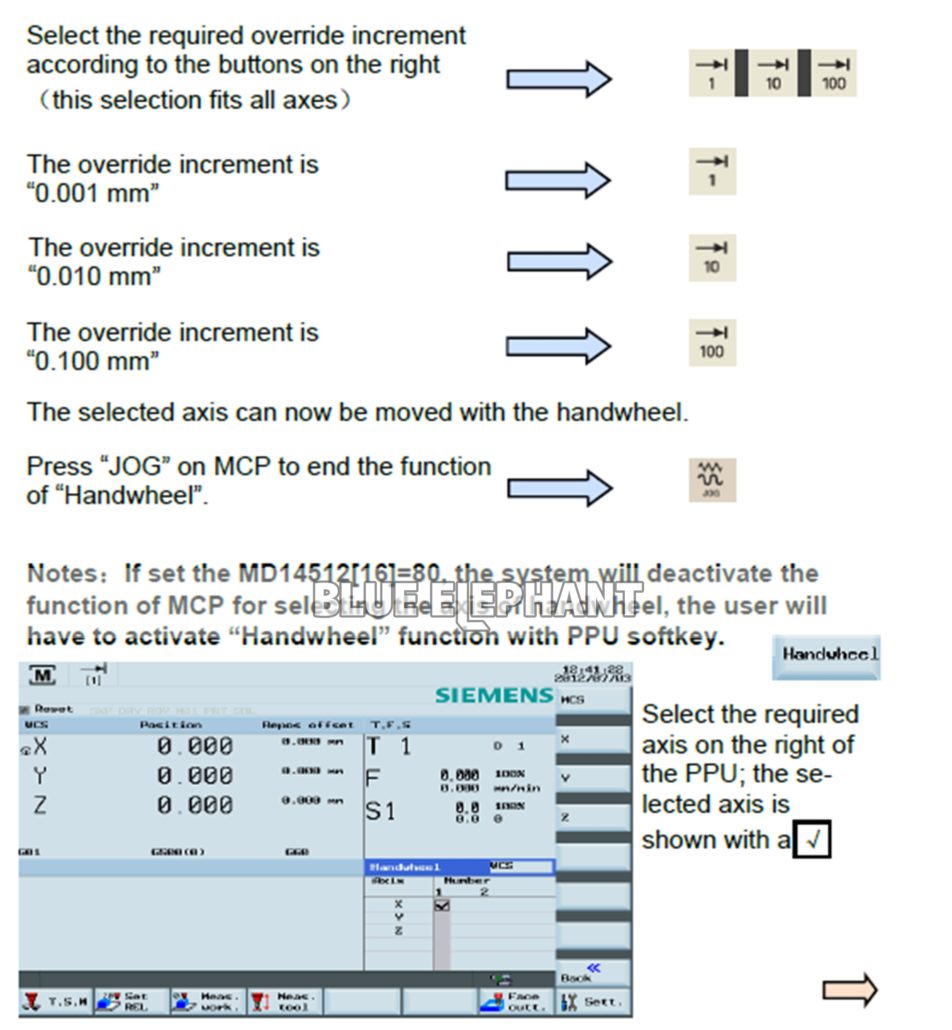
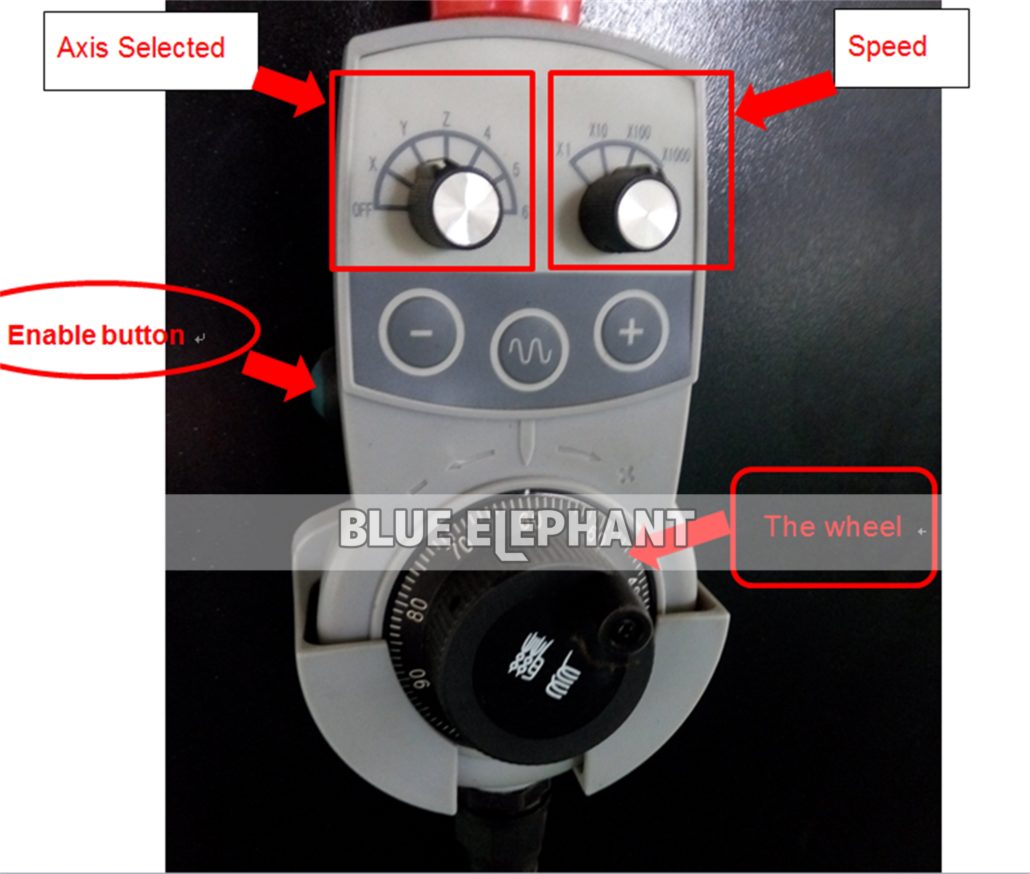
5. 4 Move axis by MPG (handwheel)
Step2
a, select the axis .
b, select the speed .
c, press the “Enable button ”,the hold on .
d, whirling the wheel .
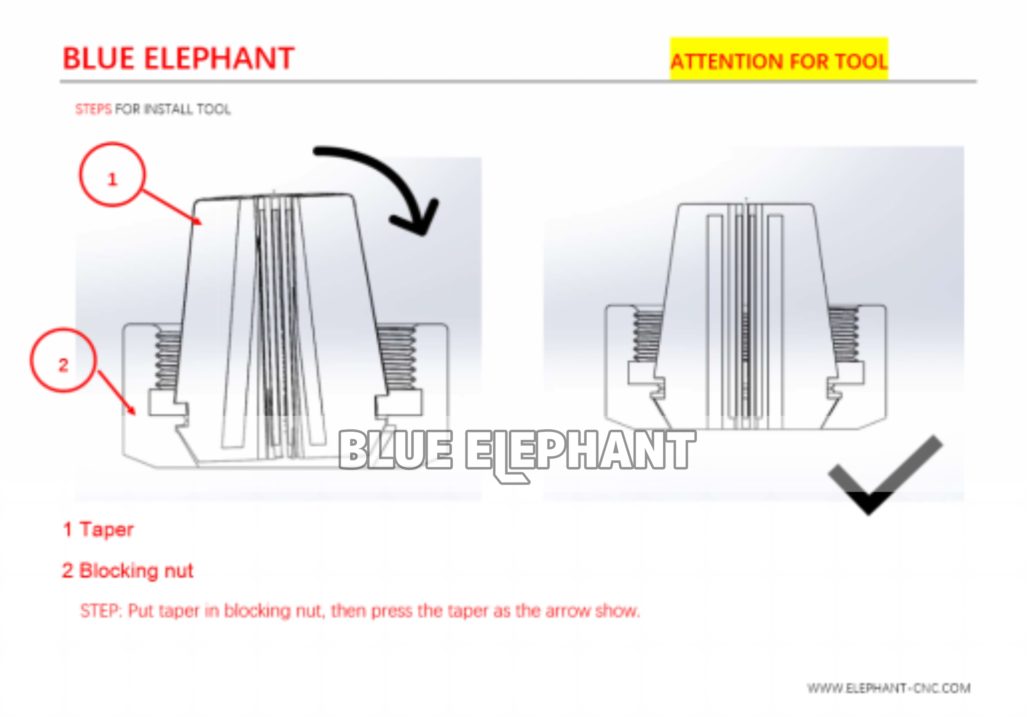
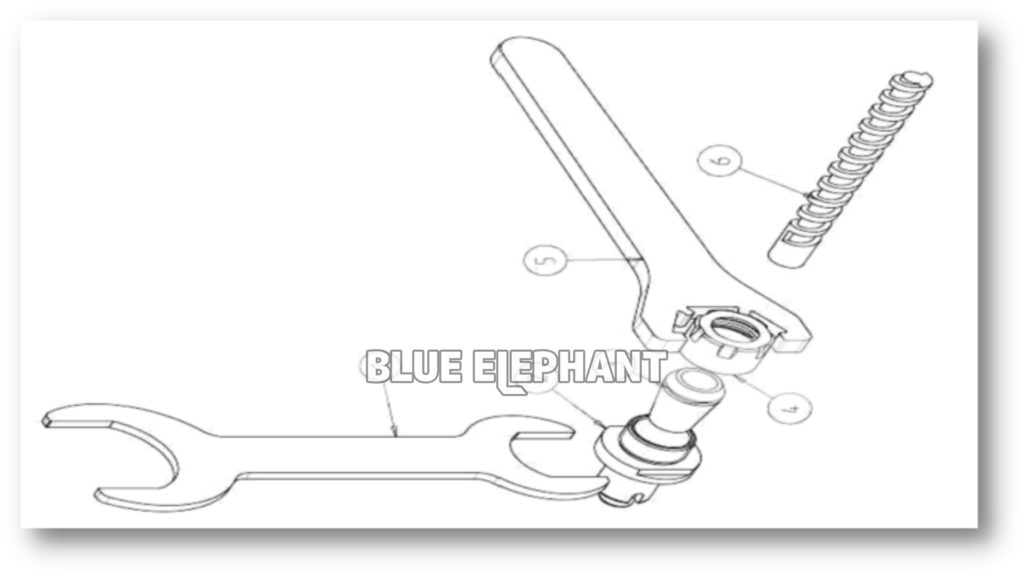
5. 5 Change tool
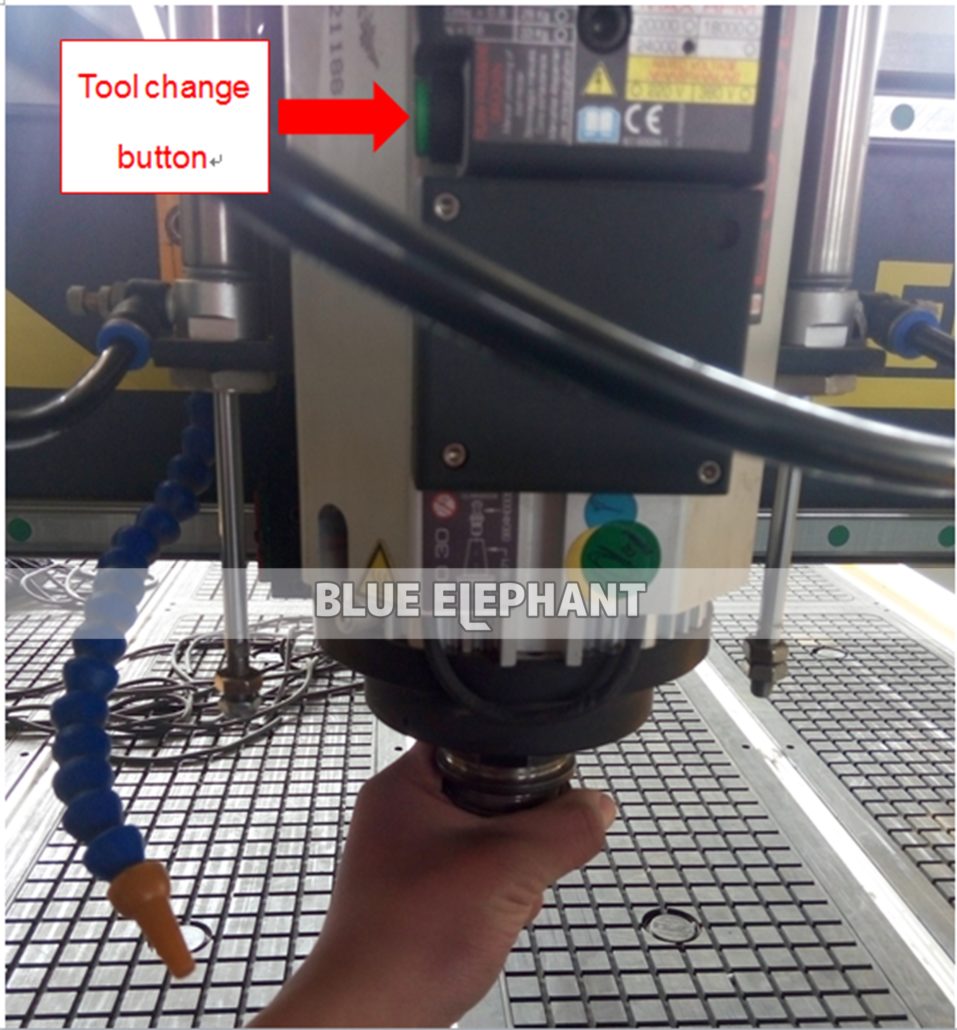
1) Change the tool by hand .
a,
Step 1
Put the tool into the spindle , push the tool upwards.
Step 2
Press the button .
b,
Release the tool
Step 1
Hold on the tool by hand .
Step 2
Press the button .
2) Change the tool by “MDI(MDA)”
MDA:
In MDA mode, you can enter and execute single and multiple lines of NC codes .
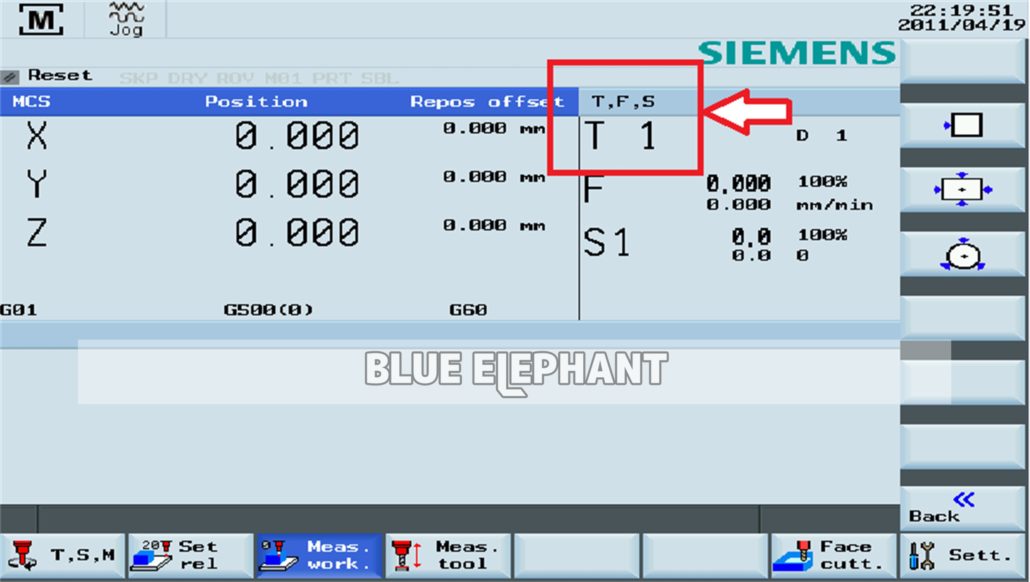
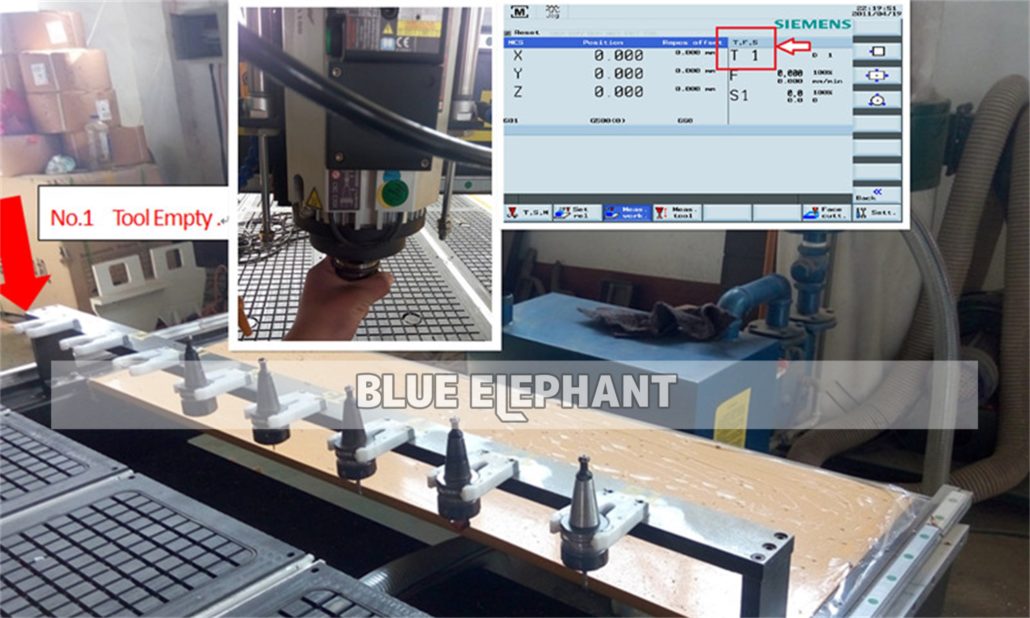
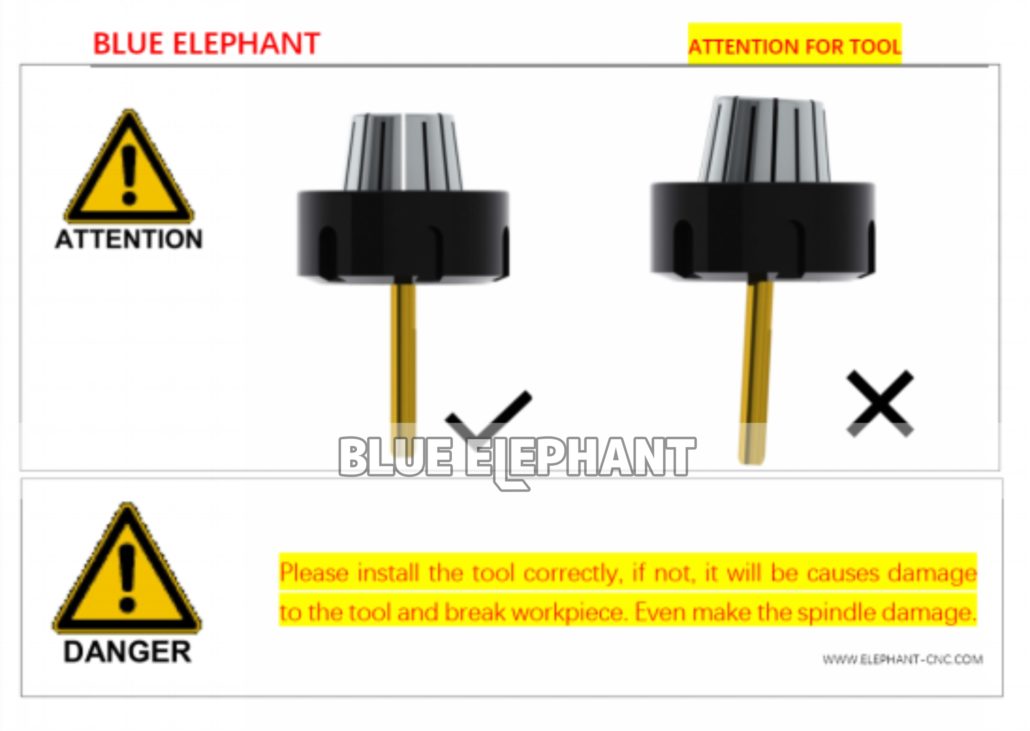
Attention : if there is tool in the spindle , please check the tool number on the screen . Just like the picture, the No1 tool in the spindle ,so No1 tool location of linear tool magazine must be empty to avoid a crash.
HERE is an example, No.1 tool in the spindle ,but I need No2 .
Now ,we start .
Step 1 .
Press In MDA mode, you can enter and execute single and multiple lines of NC codes
Step 1 .
Input : T2
Attention : please check linear tool magazine ,No.1 is empty, and No.2 have tool .
Step 2 .
Press ,Then the machine will change tool by auto .
5. 6 How to set tool length by auto .
Here is the step.
Step 1.
Press the top of the key light will on .
Step 2
Press input “T2”,like this .
Step 3
Press the machine will set the tool length auto .
5.7 Measure the tool length by Auto.
Here is an example, measure tool length from T1 to t8.
1 , Press MACHINE.
2 , Press (k8: Measure tool)
3 , Press MDA
4 , Input
5 , Press Cycle start
6 , The machine will measure tool length by auto from T1 to T8.
7 , Press the key , again. close measure tool (it is important , after measure the tool we must close it.).
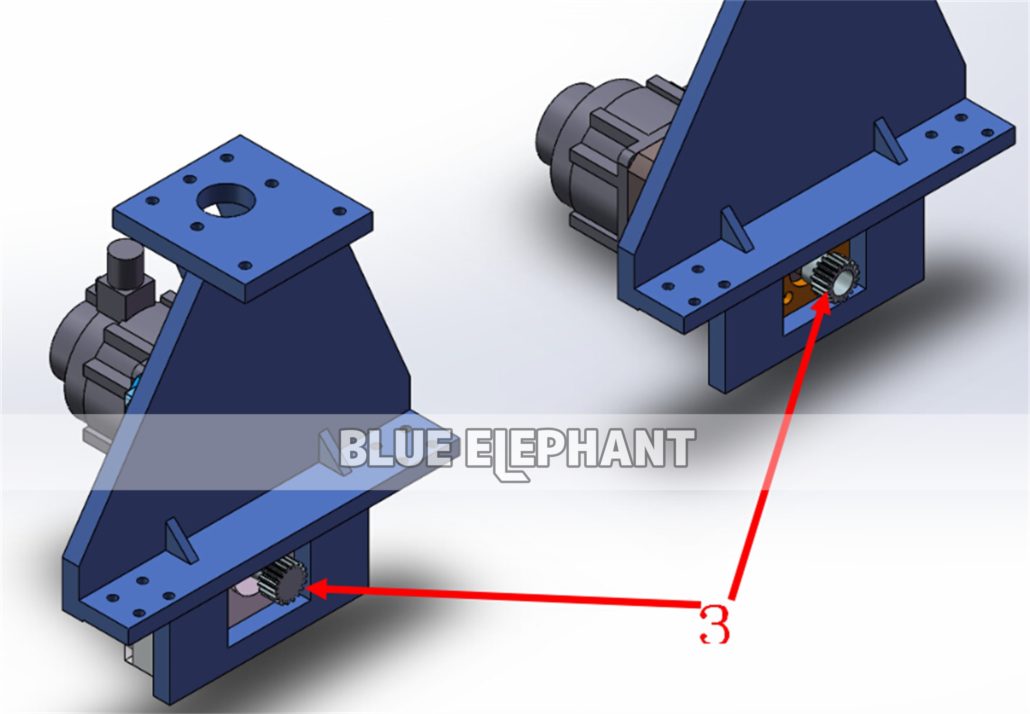
6. How to change the tools of Carousel Tool Magazine.
HRER ARE THE STEPS .(An example .changeT1 to T 2.)
(Please pay attention to the spindle ,if the screen show now is T1,so the Carousel Tool Magazine T1 location must be space .)
1 , Press MACHINE.
2 , Press MDA
3 , Input
4 , Press Cycle start
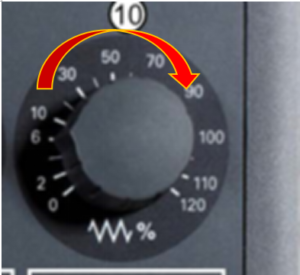
5 , Then give the speed
Clockwise : add the speed .
Ok now the machine will change the tool by auto .
7. Ps
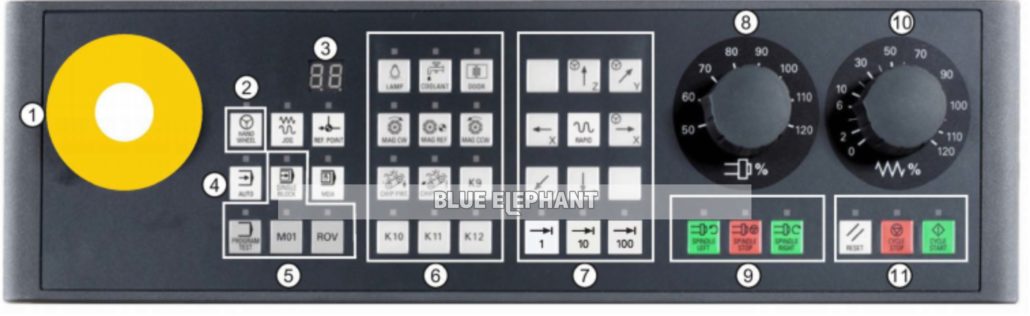
The key for our factory
Carousel tool magazine Clockwise
Carousel tool magazine A nticlockwise
K7: Brush up and down
K8: Measure tool
K9 :Oil-mist cooling
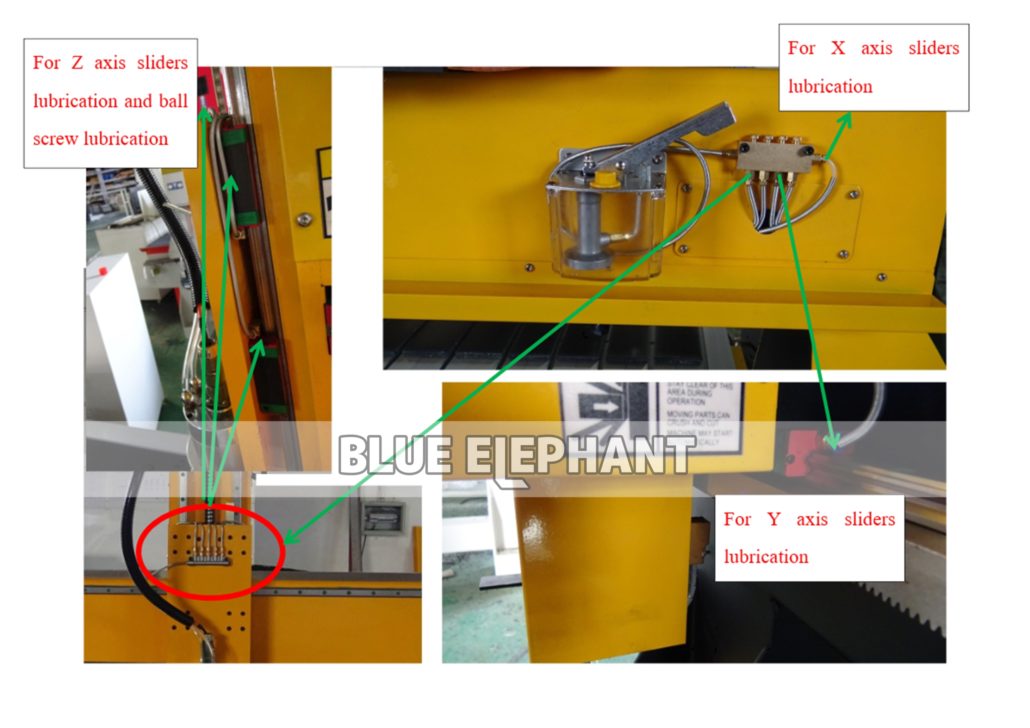
Lubrication system for moving parts
Oli: Normal Engine oil
Before first use the machine ,we need let the slider and the ball screw get oil .
After first use ,we need every day press the Manual lubrication pump once before start work . Please check the oil level.
About the tool.
About the NC file.
Please add the G- code at the start of the program.
Just like this. (G64: smoothly.)
G54 G64
M03 S12000
G00 X 0.0000 Y 0.0000 Z 5.0000
G00 X 10.0000 Y 8.6000 Z 5.0000
G01 X 291.6472 Y 9.6397 Z -1.5000 F2000
G01 X 292.2982 Y 8.7886 Z -3.0000 F6000
G01 X 292.0101 Y 9.0101 Z -3.0000
G00 X 292.0101 Y 9.0101 Z 5.0000
G01 X 1057.4000 Y 10.0000 Z -3.0000
…………………….
G01 X 675.0101 Y 9.0101 Z -3.0000
G00 X 675.0101 Y 9.0101 Z 5.0000
G00 X 0.0000 Y 0.0000 Z 5.0000
G0 Z 5.0000
M05
M30
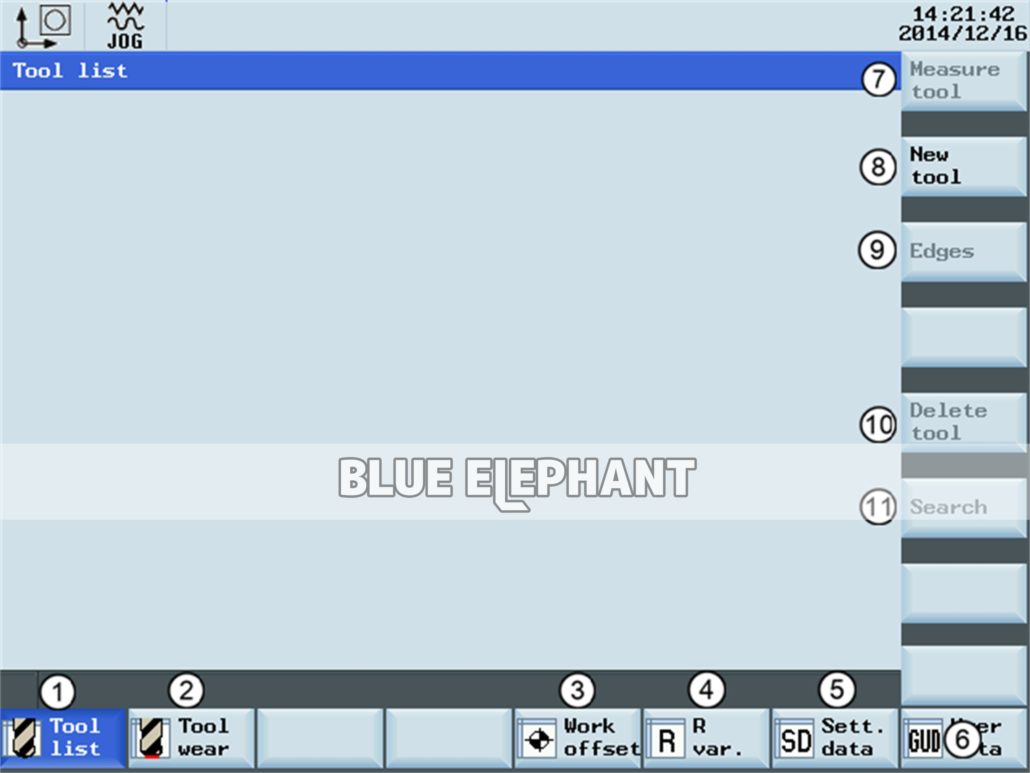
About the tool magazine parameters setting
Press the key OFFSET ,you will see the windows, like the picture.
The mark. Press the key ④.
You will see the R variable.
R11-R18: TOOL1-8 X LOCATION
R31-R38: TOOL1-8 Y LOCATION
R51-R58: TOOL1-8 Z LOCATION
Then how to get the number. here is an example.
T1.
HERE IS THE STEPS
1, the spindle must be having a tool.
2 Use MPG move the tool to the T1 location.
Yes ,the location is the loose tool and catch tool location .
Then now we do not move the machine ,back to the screen .
Check the Machine coordinate
Yes (here is an example, the number) .
X: 150.0R11: 150.0
Y: 150.0R31: 150.0
Z: -100.0R51: -100.0
3 loose tool. then up.
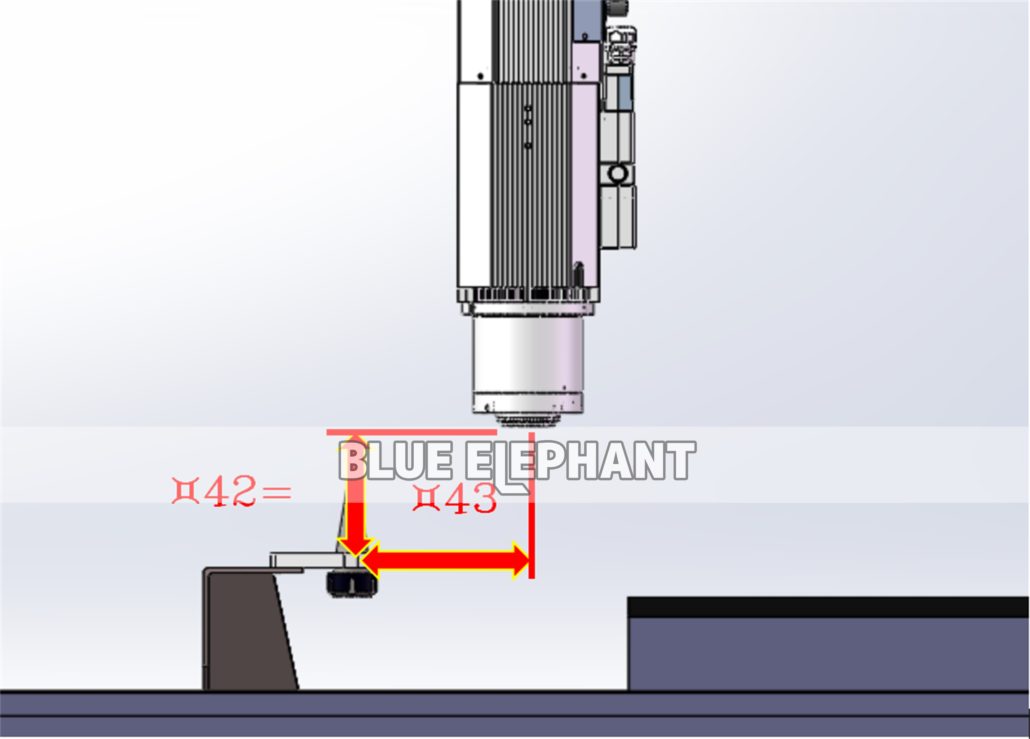
R42: after loose the tool the z axis will up to the point.
R43: after catch the tool the machine will move to this point.
R30: the tool sensor X coordinate
R40: the tool sensor Y coordinate
R41: The shortest tool can touch the sensor Z coordinate
All the number is coordinate number ,it is not the distanc.all the number is the Machine coordinate number .


 Key combination
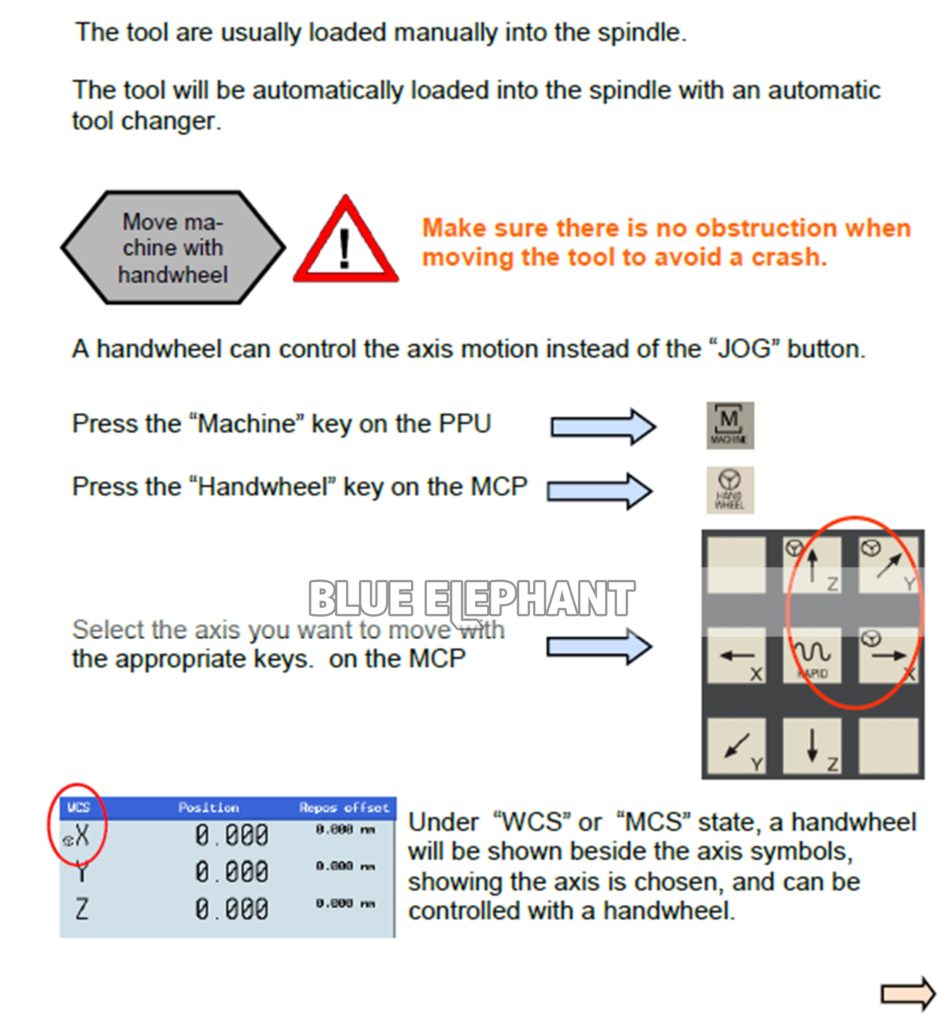
 In MDA mode, you can enter and execute single and multiple lines of NC codes
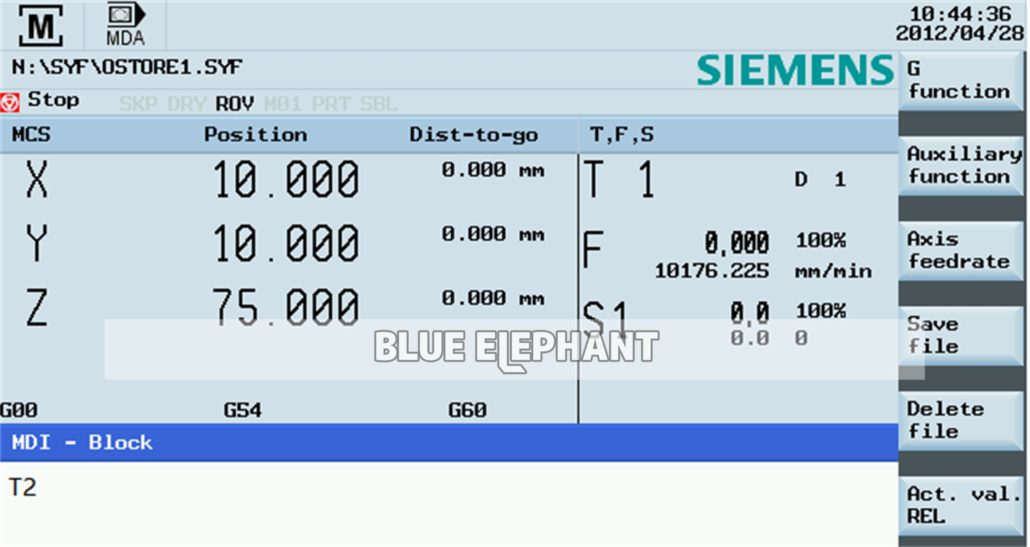
 ,Then the machine will change tool by auto .
 the top of the key light will on .
 input “T2”,like this .
 the machine will set the tool length auto .
 MACHINE.
 (k8: Measure tool)
 MDA
MDA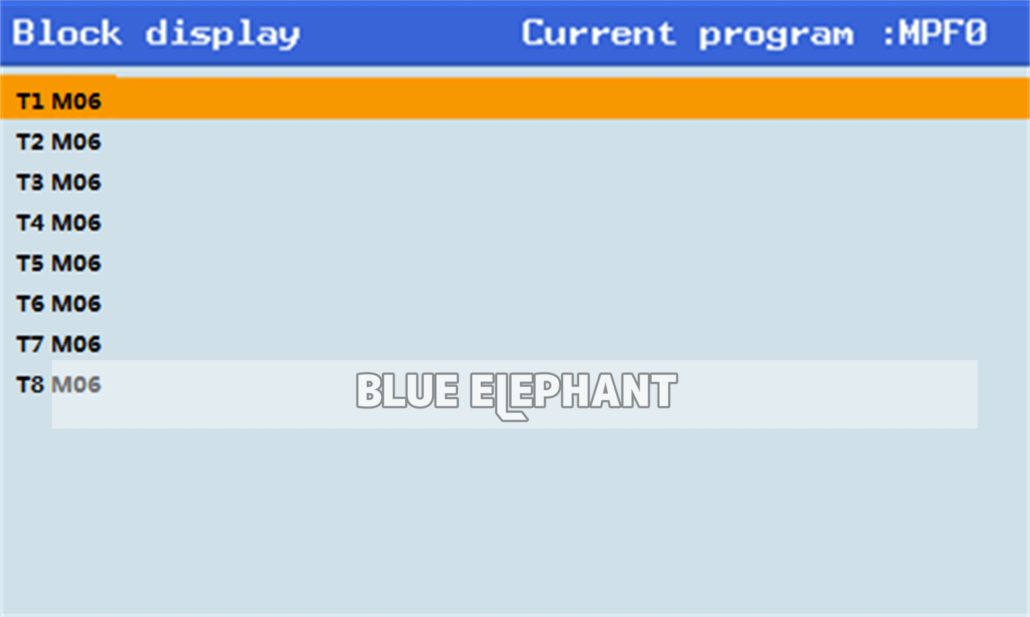

 , again. close measure tool (it is important , after measure the tool we must close it.).
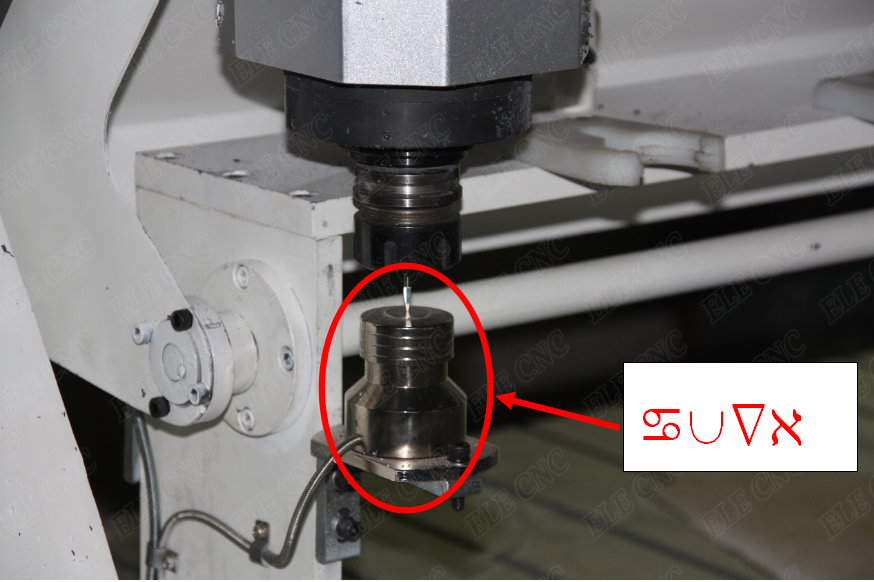
 Clockwise : add the speed .
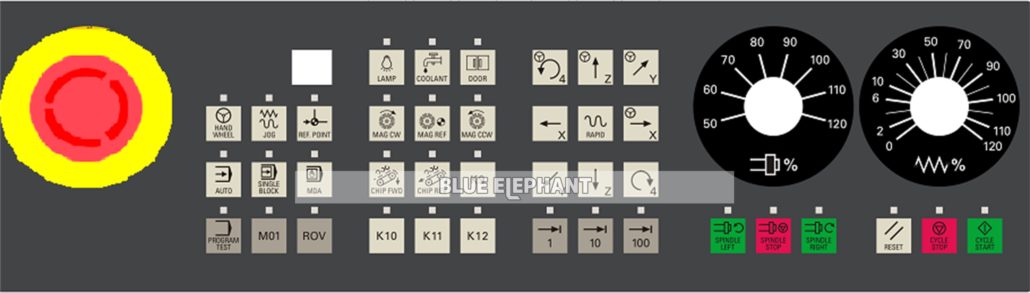
 Carousel tool magazine Clockwise
 Carousel tool magazine A nticlockwise
 K7: Brush up and down
 K8: Measure tool
 K9 :Oil-mist cooling
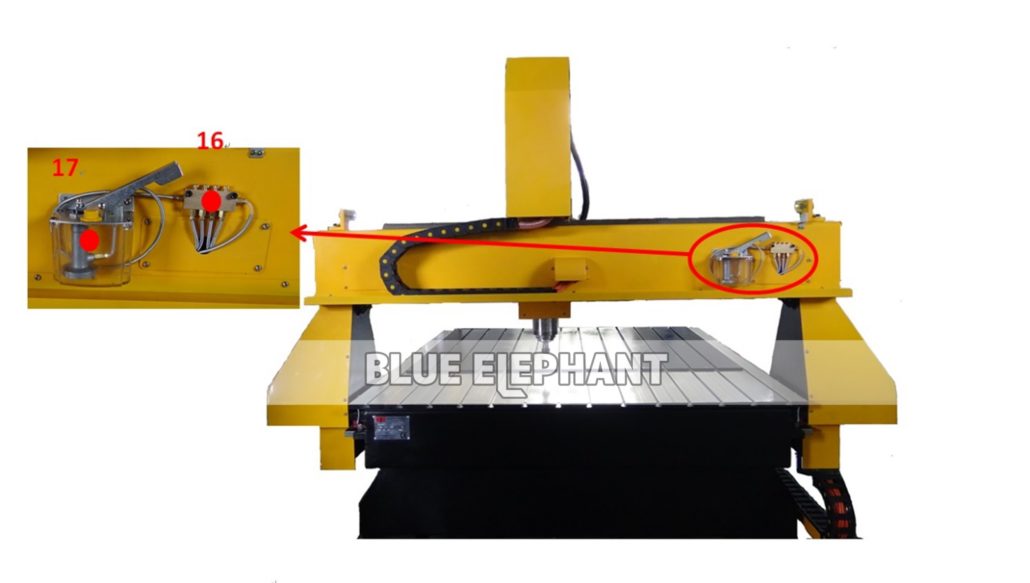


 ,you will see the windows, like the picture.
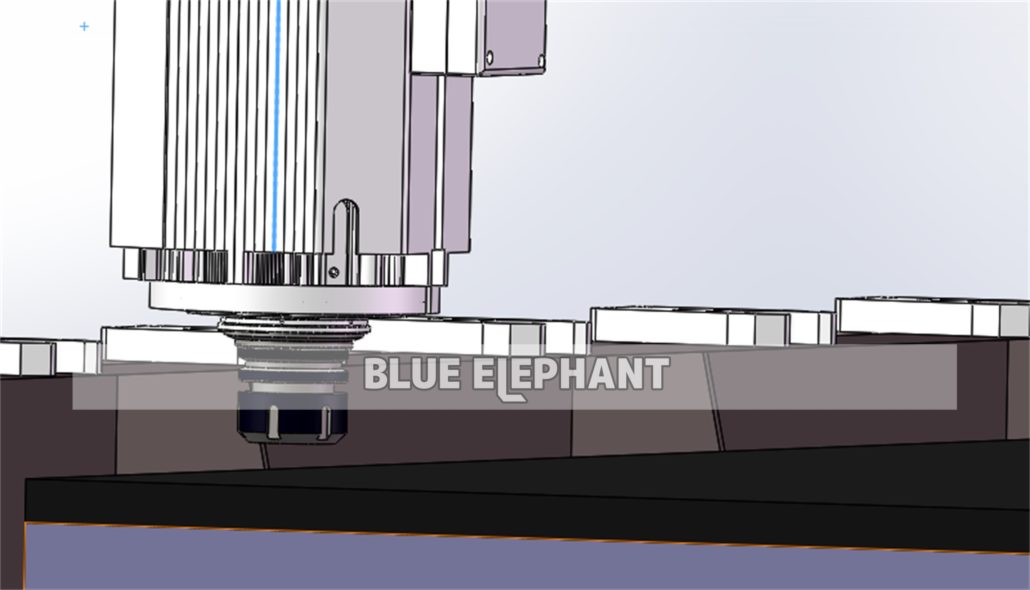


 R11: 150.0